Table of Contents
ToggleNetSuite's Bulk Purchase Workflow: Consolidated Requisition Ordering
Discover how to place bulk orders using NetSuite’s Purchase module. Understand the systematic approach to generate purchase orders from sanctioned requisitions, choose suppliers, confirm quantities, and effortlessly finalize orders. This SuitePedia manual offers detailed guidance on optimizing bulk ordering, facilitating a more efficient procurement procedure. This SuitePedia guide provides step-by-step instructions for efficient bulk ordering, enabling a streamlined procurement process.
How to Place Bulk Orders for Requisitions?
The Order Requisitions section allows you to generate purchase orders for multiple requisitions simultaneously. Choose the items from the list that you wish to order and ensure you confirm the vendor and quantity for each item. Once you finalize and submit the Order Requisitions section, purchase orders will be generated accordingly. After you submit the Order Requisitions page, purchase orders are created.
Note
To appear on the Order Requisitions page and to be included on a purchase order, requisitions require specific information:
- Items must include a vendor and rate.
- Expenses must include a vendor and amount.
For placing bulk orders:
1. Navigate to Transactions > Purchases > Order Requisitions (Administrator).
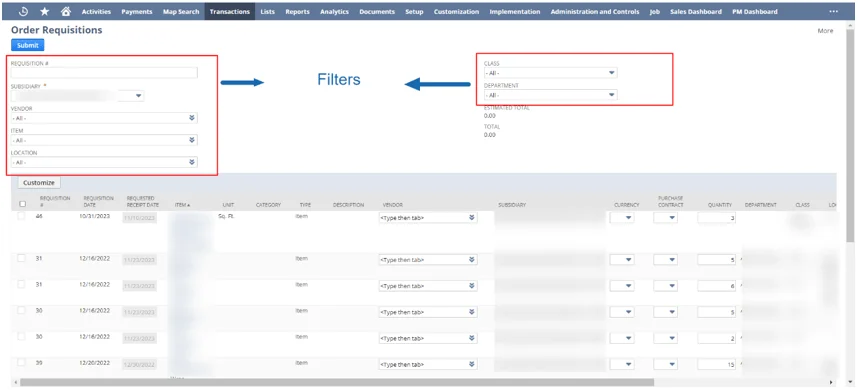
Upon accessing the Order Requisitions page, you’ll see a list of approved requisition lines awaiting orders. This encompasses requisitions marked as Pending Order or Partially Ordered.
2. You can limit the requisition lines that show in the list by selecting filters in the following fields:
- Requisition – Filter the list to show only lines from a specific requisition.
- Subsidiary– Filter the list to show only lines from a specific subsidiary.
- Vendor– Filter requisition lines based on vendor.
If you use NetSuite OneWorld and have defined vendor records shared with multiple secondary subsidiaries, note the following. You can associated this vendor credit with any of the subsidiaries assigned to this vendor. The items that can be credited reflect the combination of the selected vendor and subsidiary.
- Select a vendor to show only requisition lines that specify this vendor
- Select –All–to show only requisition lines that identify ANY vendor.
Item– Select an item to show only requisition lines that include this item.
Department – Filter the list to show only lines that specify a certain department.
Class– Filter the list to show only lines that specify a certain class.

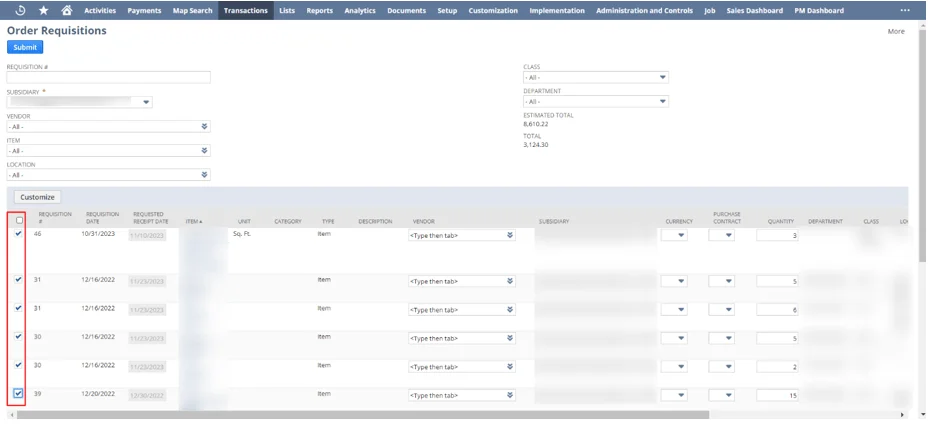
3. Check the box in the Include column next to requisition lines you want to order.
You can add multiple order lines to a purchase order regardless of the entry date or expected receipt date. This is limited only by the maximum identified in the Maximum Purchase Lines to Consolidate preference.
If you use the Multiple Currencies feature, each vendor’s primary currency is used on this transaction.

4. Accept the vendor indicated, or enter a new vendor. A vendor must be indicated to order a requisition line.
If you use NetSuite OneWorld and you have vendor records to which the selected subsidiary is assigned, note the following. You can add a vendor requisition line for any of those vendors.
5. If a qualified contract exists, the one with the lowest item base rate is displayed in the Purchase Contract
6. Accept the suggested amount to order in the Quantity column, or enter a new quantity.
The quantity, rate, and amount for each line must be equal to or greater than zero.
7. Click Submit.
Note
If a linked purchase order line is deleted, the link to the requisition line is also deleted. That requisition line re-appears on the Order Requisitions page.


