Table of Contents
ToggleHow to Create Blanket Purchase Orders in NetSuite?
Dive into SuitePedia’s information reservoir to boost buyer productivity, manage pricing discussions, and refine procurement via the establishment of blanket purchase agreements. This in-depth manual highlights the advantages of adopting blanket purchase agreements and offers guidance on adept negotiation tactics. For those utilizing NetSuite, a detailed walkthrough of the creation procedure is available. This assists in elevating your procurement approach and curbing expenses through astute utilization of blanket purchase agreements.
Create Blanket Purchase Orders In NetSuite
Enhancing buyer efficiency and precision, as well as potentially minimizing procurement expenditures, can be achieved through the utilization of blanket purchase orders. These orders establish a predetermined price for a specified quantity of items to be procured from a vendor within a defined timeframe. The blanket purchase order outlines details such as the item, price, quantity, terms, and the effective duration.
To begin with, engaging in negotiations with the vendor to establish prices and terms applicable over a specific time period proves to be a more pragmatic approach. This approach surpasses the alternative of sporadic negotiations for each individual order, promoting consistency in securing the most favourable pricing from the vendor.
Next, you can set up a blanket purchase order to define the specifics of the agreement:
- the item or items to be purchased from the vendor
- the negotiated price for the items
- the quantity of items to be purchased
- the intended delivery schedule that will be required.
After the blanket purchase order is entered, use the blanket purchase order to create, or release, any new orders for the agreed-upon items. When orders originate from the blanket purchase order, note the following. Any delivery schedule released by the buyer that falls within the effectivity dates of the blanket purchase order uses the contracted pricing and terms. The purchase orders associated with the scheduled deliveries can be released at the time the blanket purchase order is created or later, as needed. Future orders can be released either manually as determined by buyers, or automatically based on item lead times and features you use. For example, Demand Planning or Advanced Inventory Management.
After purchase orders have been created from delivery schedules and released:
- Purchase order lines reference the originating blanket purchase order.
- The blanket purchase order schedule details all associated purchase orders.
NetSuite OneWorld Accounts
In NetSuite OneWorld accounts, the following considerations apply:
- The subsidiary of the user and the subsidiary of the vendor must match. The subsidiary of the user is based on the user’s employee record, or assigned role of the user if the role has assigned subsidiaries.
- Item and location restrictions based on the role of the user are respected
- The currency selected in the header of the transaction is used for all currency values displayed on the blanket purchase order. However, currency values displayed on the purchase order are the vendor’s currency.
Creating a Blanket Purchase Order
Enter a blanket purchase order to define the items, prices, terms and delivery schedule of an agreement reached with a vendor.
Note
A blanket purchase order is a non-posting transaction.
To create a blanket purchase order:
1. Go to Vendor Dashboard > Transactions > Enter Blanket Purchase Order (Administrator).
2. Enter information for each section described below as necessary.
3. Click Save.
After you enter a blanket purchase order, you can release orders to place the orders for the items.After a blanket purchase order is saved, if you change an item rate on that blanket purchase order, the following applies
- Any existing linked purchase orders are not updated with the new rate.
- New linked purchase orders created from the blanket purchase order will reflect the new rate.
The total value of the blanket purchase order shown in the Summary window reflects the new rate.
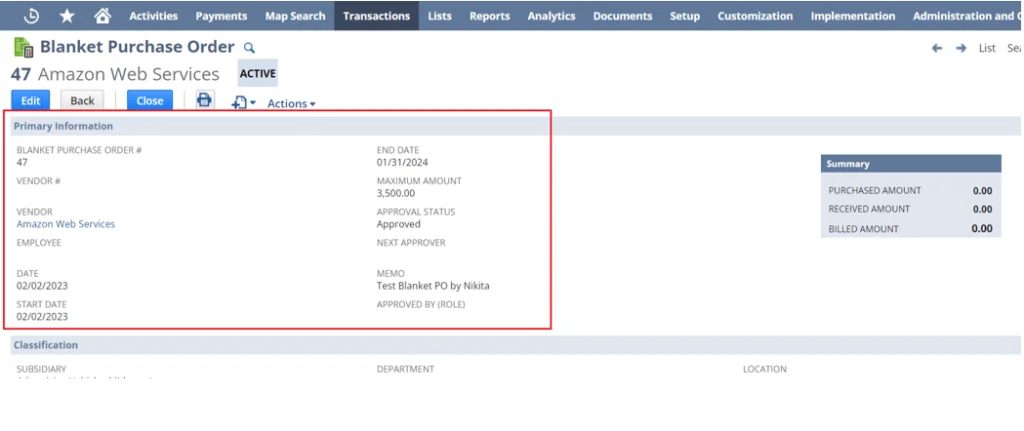
Primary Information
1. Verify or enter the blanket purchase order number.
2. Select the vendor who will provide the good or service to be ordered.
3. Select an employee to associate with this order.
- order Items
- order requisitions
- blanket purchase order schedule
- blanket purchase order record
4. The current date autofills the Date field. You can enter or select another date.
5. Enter the Start Date to define the beginning date that this blanket purchase order is effective.
If you autogenerate orders, this date is used to schedule orders for this blanket purchase order. It is the first date that orders will be created.
6. Enter the End Date to define the final date that this blanket purchase order is effective.
If you autogenerate orders, this date is used to schedule orders for this blanket purchase order. It is the last date that orders will be created.
7. The Maximum Amount is the sum currency amount of all line amounts, calculated as (Line Quantity x Rate). If you use approval routing, it is used for determining the required approval level.
8. Optionally enter a Memo. Later, you can search for text you enter in this field.
9. The Summary box displays the following totals for all orders created from this blanket purchase order:
- Purchased Amount
- Received Amount
- Billed Amount
In the Summary window on Blanket Purchase Orders, the Received Amount field does not show amounts for non-inventory and service items. These items do not impact the General Ledger at receipt
Note
In the Summary window on Blanket Purchase Orders, the Received Amount field does not show amounts for non-inventory and service items. These items do not impact the General Ledger at receipt.
The status of the Purchase Order will be Pending Approval till the PO is finally approved by the concerned approval authority. The approving authority can reject the PO also with the rejection remarks (Custom record). So, If the PO is rejected by any approving authority, then the status will show as Rejected.
Once the Purchase order is finally approved, then the status of the PO will be Pending Receipt.
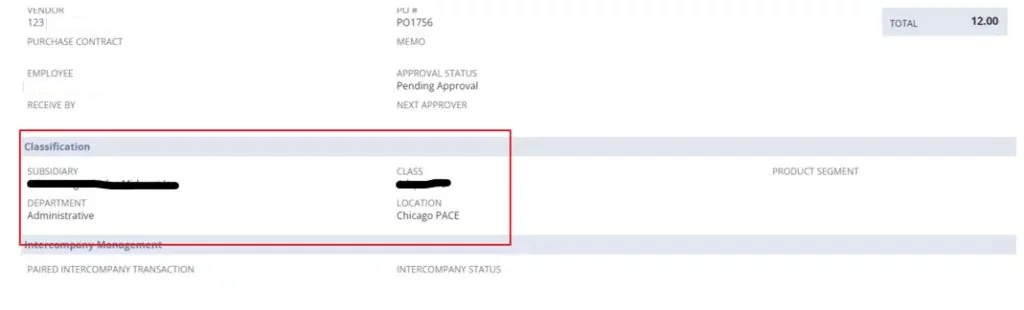
Classification
1. If you use NetSuite OneWorld and the selected vendor is shared with multiple subsidiaries, you can associate this blanket purchase order with any assigned subsidiary.
After you select the Subsidiary, the fields on the Items subtab change to reflect the values associated with the selected subsidiary. In addition, in the Classification section, the Class, Department, Location, Currency, Tax Nexus and other fields also change to reflect the selected subsidiary.
2. Select a department, class, and location to associate with this purchase.
3. The vendor’s primary currency is shown by default. If your company uses the Multiple Currencies feature, you can choose one of this vendor’s transaction currencies.
The currency at the header level is used for all currency values displayed on the blanket purchase order and cannot be changed later. However, currency values displayed on associated purchase orders will use the vendor’s currency.
Items
Note
If you use OneWorld and the selected vendor is shared with multiple subsidiaries, the item price is based on the vendor and all assigned subsidiaries.
2. The value of the Exchange Rate field is set to 1 when a currency is selected and should not be changed. It could be used in the future for multiple currency support.
3. Click the Expenses subtab to add expenses.
This section shows on the form only if you have enabled the Allow Expenses on Purchases preference.
4. Click the Items subtab to add items.
Expenses
You can associate expenses with this blanket purchase order. For example, you might be contracting an associated service, such as a number of hours of consulting or maintenance on capital equipment. Then, you can specify that during the blanket purchase order time period, you plan to spend a set amount on a certain account. Then, you can pre-schedule the expenditure. In this way, you can budget for the expense as a set amount per month or per week.
1. Select an expense Category.
2. Select the Account to associate with this expense.
3. Enter the Amount to be spent on this expense.
4. Select a Department, Class, or Location to associate with this transaction, if used.
5. Optionally enter a Memo. Later, you can search for text you enter in this field
6. To set up a schedule for this expense, click the Schedule icon.
7. The Total Amount autofills from the amount entered on the line.
8. In the Create Schedule field, choose the method to create schedules.
A) Manually
- Date – Enter the date to schedule the expense amount.
- Amount– Enter the expense amount scheduled for the date entered.
- Optionally enter a Memo. Later, you can search for text you enter in this field.
- Check the box in the Releasecolumn to create this order when the blanket purchase order is saved.
- Click Add.
- Repeat these steps to add more orders manually.
B) Autogenerate
1. Release Frequency – Choose the period of recurrence required for this schedule
- Daily
- Weekly
- Monthly
- Quarterly
- Start Date – Enter the first date to include orders in this schedule.
- End Date – Enter the last date to include orders in this schedule.
- Click Autogenerate.
- NetSuite calculates the required schedule and displays it.
Note
A manual or auto-generated schedule can be modified only until a purchase order is placed against it
- Click OK to save the schedule
- Click Add to save the line.
9. Enter additional expense lines as necessary.

Items
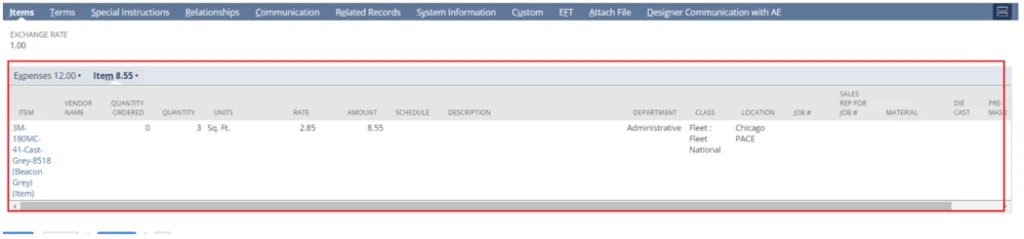
1. Select an Item to add the item to this order.
These fields autofill based on your selection here: Vendor Name, Rate, Amount, Description.
2. Verify or enter the approved rate for this item.
3. The Amount is calculated as follows: Amount = Rate x Quantity
4. Select a Department, Class, or Location to associate with this transaction, if used. A location can be selected in the header, as well as on individual lines. Line items with locations can be differentiated on the Order Items page.
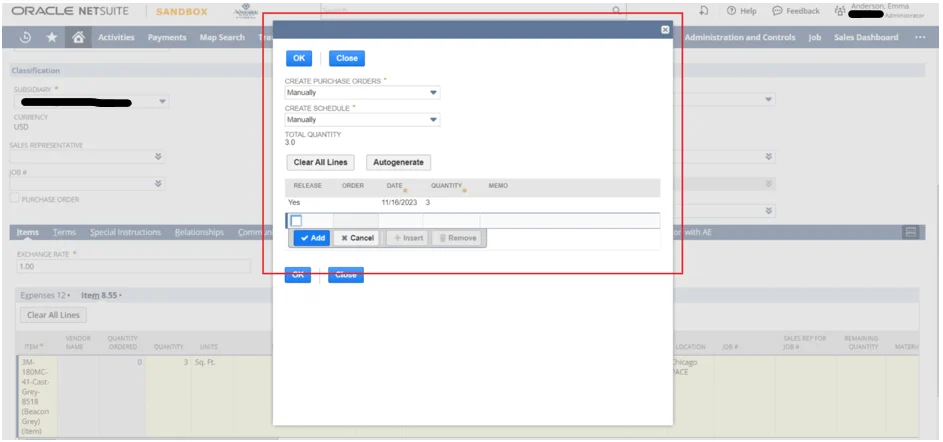
5. To set up a schedule for this item, click the Schedule icon. The schedule defines when the quantity on the line will have orders released.
- You can enter a blanket purchase order without schedules, then later you can add schedules after you confirm details with the vendor.
6. The Total Quantityautofills from the quantity entered on the line.
7. In the Create Purchase Orders field, select the method to create new orders
- Manually– You will need to manually release orders on the blanket purchase order to create the purchase orders for items.
- At Lead Time– NetSuite releases orders on the blanket purchase order as calculated by item lead times.
- items 24-50 get 2nd tier discounted pricing (5% discount)
8. In the Create Schedule field, choose the method to create schedules.
A) Manually
- Date– Enter the date to schedule the item order.
- Quantity– Enter the quantity of items to schedule on the item order.
- Optionally enter a Memo. Later, you can search for text you enter in this field.
- Check the box in the Releasecolumn to create this order when the blanket purchase order is saved.
- Click Add.
- Repeat these steps to add more orders manually.
If you have already manually entered a schedule for a blanket purchase order, you cannot then change it to autogenerate schedules.
B) Autogenerate
- Release Frequency – Choose the period of recurrence required for this schedule:
- Daily
- Weekly
- Monthly
- Quarterly
- Start Date – Enter the first date to include orders in this schedule.
- End Date – Enter the last date to include orders in this schedule.
- Click Autogenerate.
- When you click Autogenerate, NetSuite calculates the schedule. It evenly divides the total quantity across the selected release frequency for a period extending between the designated start date and end date.
- If the schedule and quantity cannot be divided evenly between all periods, the order generated for the final period is adjusted to the remainder quantity.
Note
If the sum of the quantities on all schedules is less than the Total Quantity, you will receive a warning but be able to save the form. If the sum of the quantities on all schedules is more than the Total Quantity, you will not be able to save the form.
- Click OK to save the schedule.
Note
A manual or auto-generated schedule can be modified only until a purchase order is placed against it.
9. Click Add to save the line.
10. Enter additional line items to this blanket purchase order as necessary.
Terms
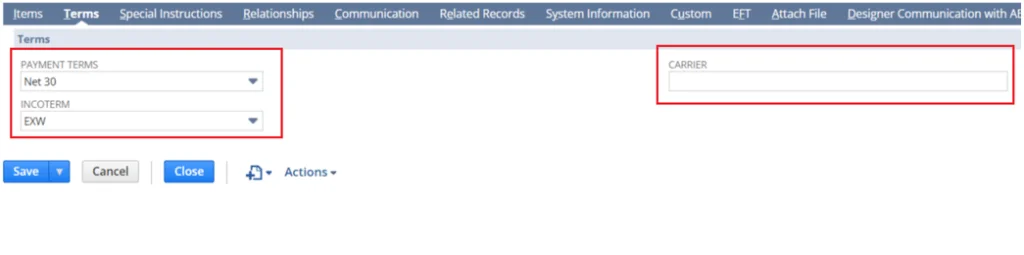
1. Payment Terms – Your selection here populates on purchase orders created from this blanket purchase order.
2. Incoterm – This is a standardized three-letter trade term. It is used on transactions related to international commercial procurement practices. These practices communicate the tasks, costs, and risks associated with the transportation and delivery of goods. Incoterms define where the customer takes ownership of the product. They are typically used for international orders, such as when an item goes through customs or crosses a border. This is similar to FOB terms used in the United States.
The standard incoterms included in NetSuite accounts include:
- EXW– Ex Works (named place of delivery)
- FCA– Free Carrier (named place of delivery)
- CPT– Carriage Paid To (named place of destination)
- CIP– Carriage and Insurance Paid to (named place of destination)
- DAT– Delivered at Terminal (named terminal at port or place of destination)
- DAP– Delivered at Place (named place of destination)
- DDP– Delivered Duty Paid (named place of destination)
- FAS– Free Alongside Ship (named port of shipment)
- FOB– Free on Board (named port of shipment)
- CFR– Cost and Freight (named port of destination)
- CIF– Cost, Insurance and Freight (named port of destination)
These can optionally be renamed on the incoterm record at Setup > Accounting > Setup Tasks > Accounting Lists.
3. Select a specific shipping carrier in the Carrier field. For example, the buyer or customer might have an account with a particular carrier to use better freight rates.
Special Instructions
Buyers can provide special instructions to vendors. Enter details in these fields as necessary:
- Purchase Order Instructions
- Product Labeling Instructions
- Packing List Instructions
- Billing Instructions
Relationships
To add a contact to this contract, enter the contact’s name, title, email address, phone number, subsidiary, and role, and click Add.
Communication
1. Use the Events, Tasks, and Phone Calls subtabs to attach activities to this transactions.
2. On the Files subtab, you can select and attach files from the File Cabinet related to this transaction. Select New to upload a new file to File Cabinet. Click Add after each file.
3. On the User Notes subtab, you can enter a title and note for any comments you want to add to this transaction. Click Add after each note.
Blanket Purchase Order Status
A blanket purchase order you enter can have one of the following statuses:
- Pending Approval– The order has not yet been approved.
- Pending Active– The current date precedes the start date.
- Active– The current date falls between the start and end dates.
- Expired– The current date is past the end date.
- Rejected
- Closed