Table of Contents
ToggleWhat Is The Advanced Receiving In NetSuite?
Learn about how NetSuite’s Advanced Receiving capability transforms the process of order management by effectively distinguishing between orders and bills. Delve deeper into Suitepedia to gain comprehensive knowledge about harnessing this groundbreaking feature.
What is the Advanced Receiving feature?
Utilize the Enhanced Receiving capability to distinguish between order receipts and billing. Through Enhanced Receiving, one has the flexibility to acknowledge items and costs prior to the arrival of an invoice.
For the incorporation of costs within enhanced receiving, it’s imperative to include costs within purchase orders. To activate this setting, an individual with administrative rights should navigate to Setup > Accounting > Preferences > Accounting Preferences. Ensure the “Permit Expenses on Purchase Orders” option is selected, then finalize by saving.
Following this setup, you’re equipped to draft purchase orders encompassing expenses.
Remember, expenses aren’t tangible goods to be physically received. Nonetheless, accurately documenting these expenses remains crucial.
For example, your Marketing Director enters a purchase order for advertising. Advertising is not an item that is delivered and received, but you want to make sure that your ads appears as they are supposed to. After the ads are approved, you can mark the advertising expense received
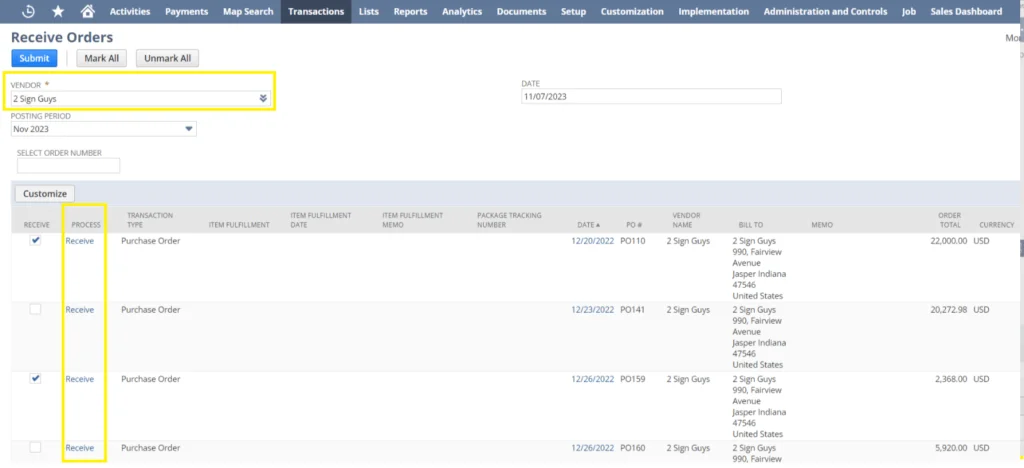
To receive expenses with advanced receiving:
1. Go to Transactions > Purchases > Receive Orders.
2. In the Vendor field, select the vendor from the list, or select All to list all open purchase orders.
3. In the Process column, click Receive next to the purchase order you would like to receive.
You can only receive one purchase order at a time.
4. Click the Items & Expenses subtab.
5. Click the Expenses subtab.
6. In the Mark Received column, check the box next to the expenses that have been accounted for.
You cannot receive partial expenses.

7. When you have finished:
- Click Save to save the information and return to the Transactions page.
- Click Save & Bill to save the information and create a bill for this purchase order.
When you are ready to pay the bill for this purchase order, go to Vendor Dashboard > Transactions > Pay Single Vendor.