
Enhance Purchase Requests: Activate Requisition Approvals Within NetSuite
Discover how to efficiently set up requisition approvals in NetSuite for a more organized procurement procedure. Delve into setting up Approval Routing, designating managers, and establishing approval processes for requisitions. This SuitePedia manual provides a detailed guide to optimize requisition handling and improve buying effectiveness.

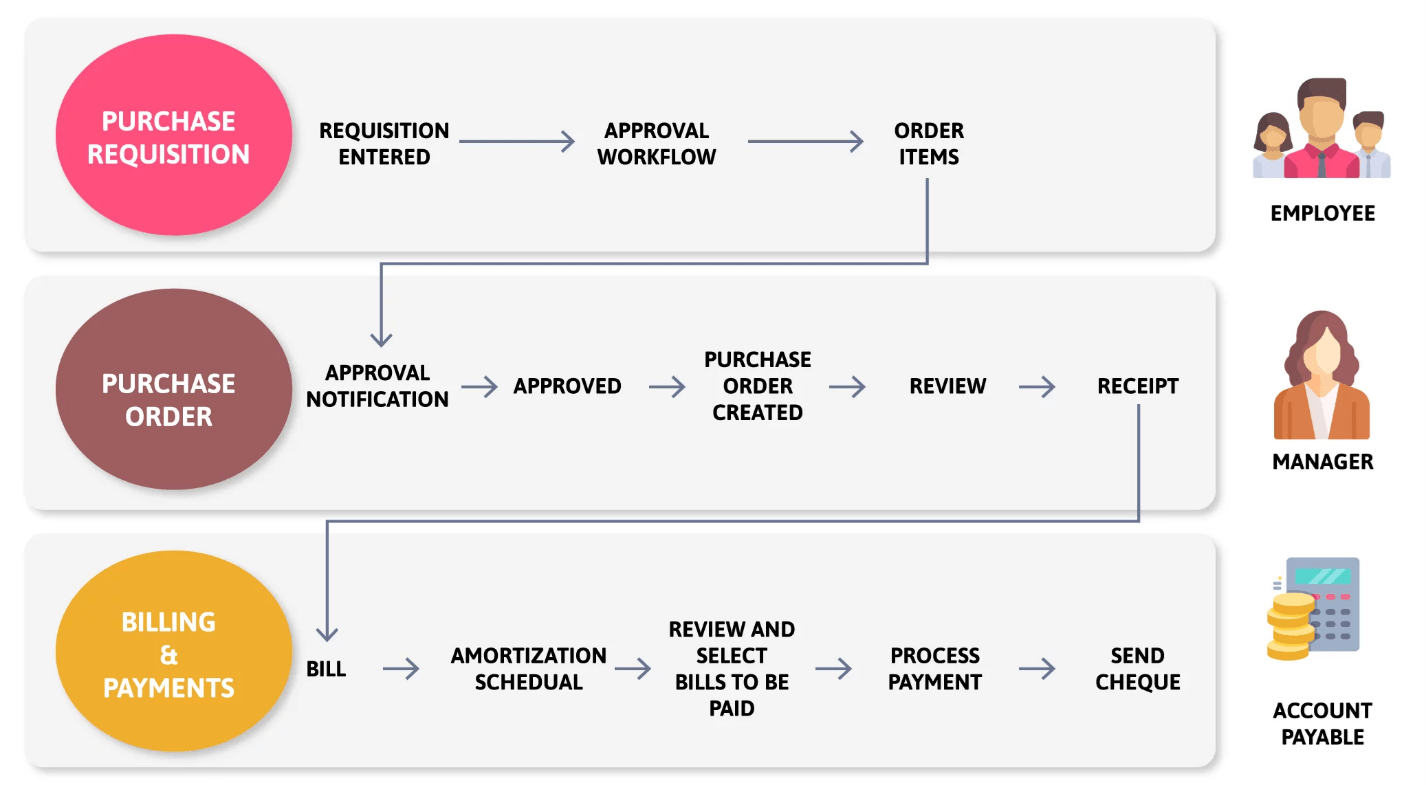
How to Activate Approval for Requisitions?
When the Approval Routing function is turned on, a supervisor’s approval becomes necessary for requisitions.
Within NetSuite, employees can submit requisitions either via the employee centre or roles granted with requisition privileges.
You have the option to designate either a supervisor or another designated individual to review and approve entered requisitions. To mandate this approval process for requisitions, utilize the Suite Flow workflow.
How can we set up Suiteflow Workflow-Based Approvals for Requisitions?
You can choose to use SuiteFlow to create your own custom workflow to process approvals for requisitions. Using SuiteFlow for requisitions allows more flexible processes for approvals.
For example, using workflows to process requisitions allows for using a non-sequential approval process or conditionalized routing. You can set up a workflow that requires action from specific employees. A workflow that shows buttons on forms at certain stages, sends email based on actions taken, and much more.
To use SuiteFlow to process requisitions:
1. Enable the features:
a. Go to Setup > Company > Setup Tasks > Enable Features.
b. On the Transactions subtab, enable the Requisitions feature.
c. On the SuiteCloud subtab, check the SuiteFlow box.
d. Click Save.
e. On the Employees subtab, check the Approval Routing box.
d. Click Save.
g. This feature must be enabled to use these fields on employee records:
- Purchase Limit
- Purchase Approver
- These fields are required for use with the requisitions workflow.
2. To enable the preference, on the Approval Routing subtab.
- Check the Requisitions box.
3. Use SuiteFlow to create a workflow to apply to your requisition.
You can incorporate the following options into your requisitions workflow:
a. Hierarchical or custom routing rules
b. Email notifications that include links to drill down to records for approval
c. Approve and Reject buttons
d. Respecting approval limits
e. Updating the Approval Status and Next Approver field on records
a. Hierarchical or custom routing rules
f. Preventing records that are pending approval from being edited
g. Designating an alternate approver
4. You can manually set a requisition to an approved status for simple approvals.
Approval Status field
When you use SuiteFlow for requisition approvals forms include an Approval Status field. The Approval Status field reflects the state of the transaction in the approval process.
Requisitions may have one of the following statuses:
- Pending Approval – The expense is in the approval queue.
- Approved – The expense has been given approval for processing.
- Rejected – The expense has not been approved and will not be processed.
Next Approver Field
When you use SuiteFlow for expense approvals, expense reports include a Next Approver field. This field is populated based on the associated workflow.
For example, in your workflow you may create a state of Pending Approval. In that state you create a formula to set the Next Approver as the employee’s supervisor.
Employee Center
When you use SuiteFlow for requisition approvals, the Employee Center is the primary workspace for processing approvals.
- The Employee Center shows the Requisitions to Approve reminder and Approve Expense Reports queue.
- Employees are shown all requisitions for which they are the next approver.
- Users are not required to have the Full permission for the Employee Center to approve and reject requisitions through the Employee Center. They can do so with only the View permission.
- Reminders that show in the Employee Center drill down to the approval queue page for requisitions. You can still click through notification email and use the buttons on the expense form (such as Approve, Reject, etc.)
- An approver that is associated with one subsidiary is able to see records that are associated with another subsidiary to make approvals.
When you use SuiteFlow for requisition approvals, the Employee Center is the primary workspace for processing requisition approvals. The Employee Centers shows the Requisitions to Approve reminder and Approve Requisitions queue. Employees are shown all purchases for which they are the next approver.
You must have the Employee Center role to access the Employee Center. An administrator can add the Employee Center role on your employee record.
When a supervisor or approver logs in to the Employee Center, approval queues display purchase requests, expense reports, and requisitions. These requisitions are entered by employees associated with all subsidiaries. Role-level subsidiary restrictions that apply to other records and transactions do not apply to approvals of purchase requests, expense reports and requisitions.
Approving a Requisition Using SuiteFlow
To approve a requisition using SuiteFlow:
5. Log in to the Employee Center.
6. Click Approve Requisitions.
7. Select a process in the Action field.
8. The Action field lists the available actions of all purchase order workflows. For example, you can select the workflow action of Approve, or alternately select the action Reject.
9. Actions available in the field are shown as follows: Workflow name : Workflow state : Workflow action
10. This is an example of a workflow action selection: Requisition Approval Routing : Pending Approval : Approve
11. The third section shows the action that will be implemented for the selected requisitions. In the case above, that action is to Approve.
12. The selection you make in the Action field filters the list of purchases that are displayed.
13. For example, select the action Requisition Approval Routing : Pending Approval : Approve. The list of requisitions that show are only ones that meet the following conditions:
- Uses the workflow named Requisition Approval Routing
- Has a status of Pending Approval
- You can select All in the Action field to show requisition associated with all workflows and actions.
14. After you select the workflow and action, check the Select box next to each requisition you want to process using the selected action.
15. Click Submit.
Supervisors can automatically be notified when they have requisitions to approve. Only an administrator can enable supervisor notification. To enable this preference, go to Setup > Accounting > Preferences > Accounting Preferences. Check the Automatically Notify Supervisors box.
In the Employee Center, your employees can view the status and approval history of their requisitions by clicking View Requisitions.
You also have the option of manually selecting a status in the Approval Status field on a requisition.
Approve Requisitions Individually
Approvers with permission can open an individual requisition and approve it.
To approve an individual requisition:
16. Go to Transactions > Purchases > Enter Requisitions > List.
17. Click Edit next to a requisition.
18. In the Approval Status field, select the appropriate status. Statuses available are as follows:
- Pending Approval
- Approved
- Rejected
19. Click Save.
Approve Requisitions in Bulk
You can approve many requisitions at one time using the bulk approval queue.
To bulk approve requisitions:
20. Go to Transactions > Purchases > Approve Requisitions (Administrator).
21. Check the box in the Approve column next to each requisition to be approved.
22. Click Submit.
Note
You can also create custom approval workflows for approval process as per requirement.
Note
Always refer to the official NetSuite documentation for detailed and specific guidance based on your NetSuite version. Additionally, you may want to involve your NetSuite administrator or seek assistance from NetSuite support for any specific challenges you encounter during the setup process.